Using the UF2 Bootloader
The UF2 Bootloader is a firmware format developed by Microsoft for PXT (now Microsoft MakeCode). It enables programming microcontrollers over MSC (Mass Storage Class) by exposing the device as a removable flash drive.
Key features
- Simple to use: presents the microcontroller as a USB flash drive
- Drag-and-drop firmware flashing
- No special drivers or software required
Use cases
- Firmware updates: simplify the end-user upgrade process and lower the barrier to update firmware
- File updates: move files into flash storage
Montic product support
| W02 | W04 | |
|---|---|---|
| Chip | Expressif ESP32-C6 | WCH CH32V208 |
| Status | ❌ Not Support | ✔ Support |
| Project | ❌ Not Support | ArcaneNibble/wch-uf2 |
Build and use UF2
The examples below use Montic W04 to show how to work with the UF2 Bootloader: compiling the bootloader and updating application firmware.
Montic W04 uses the single-core CH32V208 microcontroller. WCH does not provide an official UF2 Bootloader, but the community project ArcaneNibble implements one for CH32V003 and CH32V2xx families, which we can reuse.
wch-uf2 source code
Prerequisites
Prepare the following before building and flashing the wch-uf2 bootloader.
-
Download and install the toolchain The project uses WCH’s xw RISC-V ISA extension, so you need the official WCH RISC-V toolchain.
- If you installed WCH’s MounRiver Studio, it already includes the
arm-none-eabi-gcctoolchain atC:\\MounRiver\\MounRiver_Studio\\toolchain\\RISC-V Embedded GCC12. - You can also download the official WCH RISC-V GCC Embedded toolchain directly: MounRiver_Studio_Community_Win_V180.zip. We recommend using the repackaged mirror from ch32-riscv-ug. Extract it to a convenient path, for example
C:\\riscv-none-elf-gcc-12-win-1.92. - Install Make for Windows from the GNU Make downloads. The default path is
C:\\Program Files (x86)\\GnuWin32. - (Optional) Install Git to clone the
wch-uf2repository. - Install Python 3 to convert
.hexfiles to.uf2.
For more details on the WCH toolchain, see the Montic W04 wiki.
- If you installed WCH’s MounRiver Studio, it already includes the
-
Download the
wch-uf2source code- Download the ZIP archive from ArcaneNibble/wch-uf2 and extract it to a working directory.
- We recommend cloning the code with Git. In
CMD.exeorPowerShell.exe, go to your target directory and run:
Terminal window # change directory where you want to save the wch-uf2 codecd /path/to/save/wch-uf2-code/# clone wch-uf2 codegit clone https://github.com/ArcaneNibble/wch-uf2.git# open the wch-uf2 directorycd wch-uf2
-
Download and install the toolchain The project uses WCH’s xw RISC-V ISA extension, so you need the official WCH RISC-V toolchain.
- First install base tools (example using apt):
Terminal window # update apt sources if neededsudo apt update# install toolssudo apt install git make python3- If you installed WCH’s MounRiver Studio, it already includes the
arm-none-eabi-gcctoolchain at~/MounRiver/MounRiver_Studio/toolchain/RISC-V Embedded GCC12. - You can also download the official WCH RISC-V GCC Embedded toolchain: MRS_Toolchain_Linux_x64_V1.92.1.tar.xz. Extract it to a path such as
~/MRS_Toolchain_Linux_x64_V1.92.1/RISC-V_Embedded_GCC12/bin.
For more details on the WCH toolchain, see the Montic W04 wiki.
-
Download the
wch-uf2source code- Download the ZIP archive from ArcaneNibble/wch-uf2 and extract it to a working directory.
- We recommend cloning the code with Git. In your terminal, go to your target directory and run:
Terminal window # change directory where you want to save the wch-uf2 codecd /path/to/save/wch-uf2-code/# clone wch-uf2 codegit clone https://github.com/ArcaneNibble/wch-uf2.git# open the wch-uf2 directorycd wch-uf2
WCH provides the standard xPack GCC toolchain for macOS, which does not include the xw extension. Because wch-uf2 depends on xw, we cannot compile it on macOS at this time.
We recommend using the prebuilt binaries from wch-uf2-v0.0.0.
Build the UF2 Bootloader
Set the correct working path (PATH) in CMD.exe or PowerShell.exe:
# add make.exe to PATHset PATH=%PATH%;"C:\\Program Files (x86)\\GnuWin32\\bin"Go to the wch-uf2 directory:
# go to the wch-uf2 root directorycd wch-uf2Update the Makefile tool paths:
.PHONY: all clean
RV_ARCH = rv32imacxw
# modify CC and OBJDUMP execute path with MounRiver IDE toolchainCC = riscv-none-elf-gccOBJDUMP = riscv-none-elf-objdumpCC = "C:\\MounRiver\\MounRiver_Studio\\toolchain\\RISC-V Embedded GCC12\\bin\\riscv-none-elf-gcc.exe"OBJDUMP = "C:\\MounRiver\\MounRiver_Studio\\toolchain\\RISC-V Embedded GCC12\\bin\\riscv-none-elf-objdump.exe"CFLAGS = -Wall -ggdb3 -Os -march=$(RV_ARCH) -ffunction-sections -fdata-sections -ffreestandingLDFLAGS = -Wall -ggdb3 -march=$(RV_ARCH) -Wl,--gc-sections --specs=nosys.specs
# more code ...
Build the bootloader with Make:
# run make commandmake -f Makefile
# expected output# "C:\\MounRiver\\MounRiver_Studio\\toolchain\\RISC-V Embedded GCC12\\bin\\riscv-none-elf-gcc.exe" -Wall -ggdb3 -Os -march=rv32imacxw -ffunction-sections -fdata-sections -ffreestanding -c -o startup.o startup.S# "C:\\MounRiver\\MounRiver_Studio\\toolchain\\RISC-V Embedded GCC12\\bin\\riscv-none-elf-gcc.exe" -Wall -ggdb3 -Os -march=rv32imacxw -ffunction-sections -fdata-sections -ffreestanding -c -o bootloader.o bootloader.c# "C:\\MounRiver\\MounRiver_Studio\\toolchain\\RISC-V Embedded GCC12\\bin\\riscv-none-elf-gcc.exe" -Xlinker -Map=bootloader.map -Wl,--script=linker.lds -nostartfiles -o bootloader.elf startup.o bootloader.o# "C:\\MounRiver\\MounRiver_Studio\\toolchain\\RISC-V Embedded GCC12\\bin\\riscv-none-elf-objdump.exe" -xdsS bootloader.elf >bootloader.dump
The build produces bootloader.elf, which you need to convert to .hex.
# convert elf to hex"C:\\MounRiver\\MounRiver_Studio\\toolchain\\RISC-V Embedded GCC12\\bin\\riscv-none-elf-objcopy.exe" -O ihex "bootloader.elf" "bootloader.hex"TODO: Linux-specific details need to be added.
After prerequisites are in place, set the environment variables:
# add GCC toolchain to PATHexport PATH=$PATH:~/MRS_Toolchain_Linux_x64_V1.92.1/RISC-V_Embedded_GCC12/bin# or if you use the WCH MounRiver IDE toolchainexport PATH=$PATH:"~/MounRiver/MounRiver_Studio/toolchain/RISC-V Embedded GCC12/bin"Go to the wch-uf2 directory:
# go to the wch-uf2 root directorycd wch-uf2Build the bootloader with Make:
# run make commandmake
# expected output# riscv-none-elf-gcc -Wall -ggdb3 -Os -march=rv32imacxw -ffunction-sections -fdata-sections -ffreestanding -c -o startup.o startup.S# riscv-none-elf-gcc -Wall -ggdb3 -Os -march=rv32imacxw -ffunction-sections -fdata-sections -ffreestanding -c -o bootloader.o bootloader.c# riscv-none-elf-gcc -Xlinker -Map=bootloader.map -Wl,--script=linker.lds -nostartfiles -o bootloader.elf startup.o bootloader.o# riscv-none-elf-objdump -xdsS bootloader.elf >bootloader.dump
The build produces bootloader.elf, which you need to convert to .hex.
# convert elf to hexriscv-none-elf-objcopy.exe -O ihex "bootloader.elf" "bootloader.hex"The macOS toolchain currently cannot compile wch-uf2. Use the ArcaneNibble binaries instead.
If you have access to Windows or Linux, use those systems to build the wch-uf2 bootloader.
Flash the UF2 Bootloader
You can flash the bootloader with the WCH-Link debugger or the built-in USB ISP, similar to the Montic W04 getting-started guide. See step 4 (Flashing) of the Blink demo in the W04 guide for details: link.
Update application firmware
After installing the UF2 Bootloader, you can update application firmware through it. Follow the steps from the W04 getting-started guide and reuse the Blink demo .hex output.
Convert WS2812_LED.hex to .uf2 to place it at the correct flash address. Use uf2conv.py (download from here).
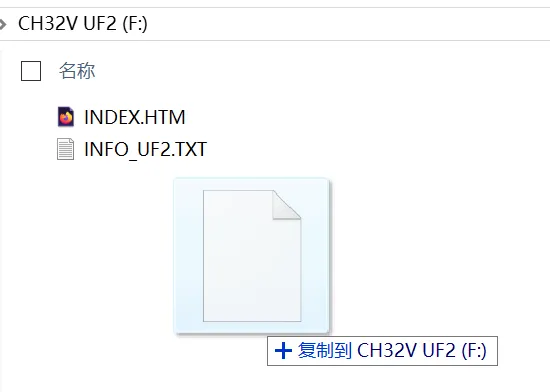
# convert hex to uf2/path/to/uf2conv.py -c -f 0x699b62ec -b 0x08001000 -o WS2812_LED.uf2 WS2812_LED.hexFinally, connect the Montic W04 to your PC with USB-C. A new USB flash drive will appear; drag WS2812_LED.uf2 onto it to update the firmware.
UF2 limitations
UF2 is convenient for development and testing but has some constraints:
- Compatibility: requires USB support, and not all microcontrollers support MSC mode
- Performance: write speed is limited by the USB MSC protocol
- Features: does not support complex boot configurations